
There are multiple ways to install Lightroom Presets. Here we will go through the steps Involved. There are 2 ways to install presets on your Lightroom. They are:
- Moving Files into Lightroom Presets Folder
- Importing Presets in Lightroom Directly
Both these methods are easy and can be done with minimum effort.
How To Install Lightroom Presets via Moving Files into Lightroom Presets Folder
Common Steps:
- Download and Extract the Presets of your choice.
- Keep the folder containing the Presets open and ready to Copy.
How to Install Lightroom Presets in Lightroom 4, 5, 6, CC & Classic CC for Windows
- Open Lightroom
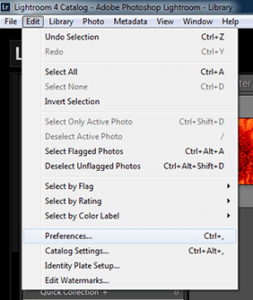
- In the Main Menu Go to: Edit > Preferences
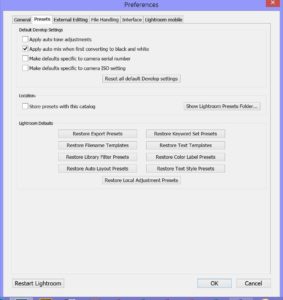
- Click on the Button – Show Lightroom Presets Folder
- Double click on Lightroom
- Double click on Develop Presets
- Copy the folder(s) of your presets into the Develop Presets folder
- Restart Lightroom
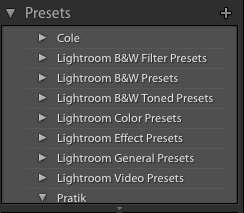
- In the Develop Tab you will see all the recognized Presets listed in the Presets Section
How to Install Lightroom Presets in Lightroom 4, 5, 6, CC & Classic CC for Mac
- Open Lightroom
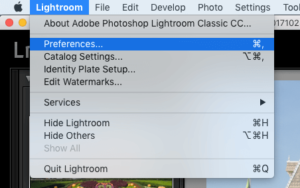
- In the Main Menu Go to – Lightroom (Drop down Menu) > Preferences (See below picture)
- Click on the Button titled – Show Lightroom Presets Folder

- Navigate to – Lightroom > Develop Presets
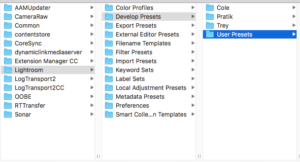
- Copy the folder(s) of your presets into Develop Presets folder
- Restart Lightroom
- In the Develop Tab you will see all the recognized Presets listed in the Presets Section
How To Install Lightroom Presets by Importing Presets in Lightroom Directly
Common Steps:
- Download and Extract the Presets of your choice.
- Keep the folder containing the Presets open and ready to Copy.
How to Install Lightroom Presets in Lightroom 4, 5, 6, CC & Classic CC for Windows
- Open Lightroom
- Navigate to the Develop Tab
- Create a new folder inside of Lightroom. You can do this by either:
- Pressing Ctrl + Alt + N
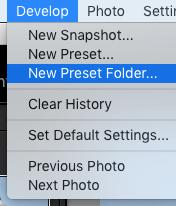
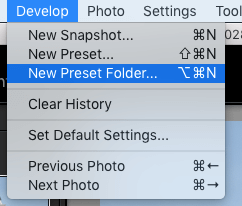
- Click on Develop in the Main Menu and select New Preset Folder
- Right-click in the Preset Section and Select New Folder
- Import presets into new folder by right clicking on your folder name and selecting Import
- Locate the unzipped folder that you extracted from the zip file earlier and select all of your presets for that folder and click Import
How to Install Lightroom Presets in Lightroom 4, 5, 6, CC & Classic CC for MAC
- Open Lightroom
- Navigate to the Develop Tab
- Create a new folder inside of Lightroom. You can do this by either:
- Pressing Command + Option + N
- Click on Develop in the Main Menu and select New Preset Folder
- Right-click in the Preset Section and Select New Folder
- Import presets into new folder by right clicking on your folder name and selecting Import
- Locate the unzipped folder that you extracted from the zip file earlier and select all of your presets for that folder and click Import